Monday, 30 April 2018

Dear Jane Quilt, H9 & J9 - 25 of 225

Yesterday I finished the two blocks I had started on Thursday.

H9 was made by making a pinwheel block out of four half square triangles and then snowballing the corners and appliqueing on four diamonds.


And here's the close up.


I then meant to make I9, however, by mistake I made J9.  I am not going to remake it in a different colour, so when it comes to make J9, I will make I9 instead.....  J9 was simply a box with two frames.  The middle frame I made with mytered corners so I could open them to make orange peels and show the main fabric placed underneath.


And here's the close up.


And here are the first 25 completed blocks.


I now have 1/9th of the quilt made and it took me 3 months which means I am averaging 2 blocks a week.  I'd like to average 3 blocks a week so would like to make 12 blocks in May.  There are 24 blocks in the next round, so I would like to have 12 more blocks and the next round completed by the end of June.

Friday, 27 April 2018

Dear Jane Quilt, G9 - 23 of 225


Yesterday our Dear Jane Group met for another sew day and I was able to finish a block and start on two more.  Here are the pieces I cut out for G9.


And here it is with some individual sections sewn.


Here's the completed block with the book picture.


And the close up.


I'm still having fun figuring out how to put each block together.  It was so windy and rainy yesterday that when I was getting into the vehicle to come home, one of the pieces of fabric I had cut out for block I9 blew right off my layout board which was slightly sticking up out of my bag.  It was across the parking lot and gone in a flash!

Linking to Crazy Mom Quilts for Finish it up Friday.

Tuesday, 24 April 2018

Dear Jane Quilt, F9 - 22 of 225


This is another block which most people would likely simply applique.  In my quest to avoid applique, I no doubt increased the complexity of this block quite a bit, but I had fun doing it!

I first cut a square of background fabric into four triangles by cutting an X on the diagonal.  I then cut strips off the edges of the internal sides of the triangles and sewed them back on leaving a gap in the middle of the seams.


I ironed a square of main fabric in half, wrong sides together.

I then sandwiched two of the triangles around the folded central square matching the raw edges and sewed them together.

This is a method of making a 3D faux cathedral window.


I then sewed the two pairs of triangles together sandwiching the now popped open main square between them.  FYI, you can access a tutorial on how to sew a 3D Faux Cathedral Window here.


Once the block is opened, you have a popped up main square of fabric on top of the background fabric.


I then rolled over and sewed down the edges of the square without adding the "window" so the centre remains the main fabric colour.


I then rolled the edges of the slits in the background fabric under in order to create the orange peels and sewed the edges down with the main fabric triangles placed underneath showing through.


I think it looks very similar to Jane's block.  The close up shows a few imperfections, but I have decided it is good enough.

I haven't sewn very many Dear Jane blocks this month, but I am still having fun when I do get one made!

Sunday, 22 April 2018

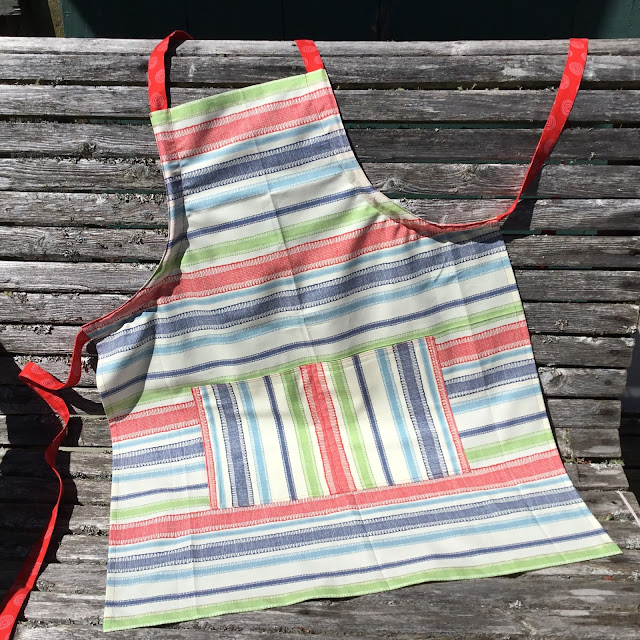
An Apron for Ainsley

My daughter Ainsley picked out fabric from my stash for an apron awhile ago.  We both wanted red ties, but I didn't have anything that matched and we settled on blue fabric.  I was never really happy with the blue fabric and likely the reason I hadn't made the apron yet.  I recently bought some red fabric and made the apron today while I was skype sewing with my friend Marilyn.  I really like the striped fabric as it reminds me of dish towel fabric.  For contrast, I turned the fabric the opposite way on the pocket.


I think this is the fourth apron I have made by drawing around an apron my mother-in-law made for me a long time ago.  (30+ years!)  I really like how the tie runs through facings around the armholes making the neck fully adjustable but still only needing to be tied in one place.  I made the ties long enough to wrap to the front and tie if you want.  If desired, the armhole facings can be sewn on the back and pulled around to the front for a design accent which is how my MIL made the original apron for me.


Today, I finally drew up a paper pattern as I am sure this is not the last time I will make an apron using this same pattern.

Friday, 20 April 2018

Cat's Meow Mystery Quilt Step 2 and a Few Notes

Step 2 of the Cat's Meow Mystery quilt was introduced last night at the Mayflower's Quilting Guild.

First let me show you what blocks were made from Step 1.


I only have a few tips for step two.

Note #1 - Before you cut any strips, the pattern tells you that you will be making half square triangles and if you have a favourite way of making them instead of how they suggest, make them your way.  This may mean you cut the fabric differently.

Note #2 a - Half of the half square triangles are joined to a square one way and the other half are joined another way so you end up with mirror image blocks so just be aware of this.

Note #2 b - You then snow ball two opposite corners on some rectangles.  Just be aware that half of the rectangles are done one way and the other half are done mirror image as well.

Note #3 - The snowballed rectangles are also ironed differently, one set is ironed down and the other set is ironed up which makes sewing them together very easy as they will nest nicely.


Step 3 will be given in May and a link will be provided to the Cat's Meow Mystery Quilt on-line.

Step 4 will be to bring your completed quilt to the September meeting for the chance to win some prizes!

Thursday, 19 April 2018

Wednesday was a Whopper of a Sew Day!

I sewed with some of my fellow guild members for almost four hours (with a lunch break) and managed to get 24 more basket blocks done, 12 in orange fabrics and 12 in yellows.  Here are 48 baskets so far in blacks, reds, oranges and yellows.


I'll be working on greens and turquoises next.

Then my daughter came over for super and to work on the wedding quilt for one of her girlfriends.  We worked for a couple of hours and got the second small triangle on all of the blocks which means all the blocks are now sewn.  Here are some of the blocks on the design wall.


We will likely be placing them all randomly, but for fun I laid them out so the diamonds were in matching pairs.  (I kind of like it!)  Below I laid them out so the touching side pieces match to make parallelograms.


The next step will be to finalise the arrangement of the blocks on the design wall and get the top put together.  Our goal is to have the top in one piece by the end of April and then I will have all of May to quilt and bind it for the wedding in early June.   Very doable.

Sunday, 15 April 2018

X & O Comfort Quilt

This was a quilt put together from donated blocks from my guild.  I volunteered to quilt it as I wanted the practise with rulers on my mid-arm.  Here's a picture of it on the frame.


After I did the ruler quilting, I decided it needed a bit more quilting down the centres of the coloured blocks so I just put the walking foot on my regular machine and added in diagonal lines.  Here's a before picture.


Here's a picture of it with the additional quilting and the binding on and all washed and dried.


Here's another picture showing the backing.


I was slow quilting it, but even from the first row to the last row I could see improvement in my quilting.  I wobbled and bobbled here and there, but overall was satisfied with the outcome.  I will hand this in to the Mayflower Quilters Guild on Thursday and it will be off to one of the comfort charities we support.

Tuesday, 10 April 2018

Touch Base Tuesday - I am behind with some of my posts

The week before last,  my daughter and I got together and did some more sewing on the green Triad Quilt for her girlfriend's wedding gift.  We now have one side triangle sewn to all the main triangles with one side left to go.  I put a few of the partially sewn blocks on the design wall just to see how the pattern was developing.  Looking good!


Two weekends ago now I took a class on walking foot quilting and beginner free motion quilting taught by Jane and put on by my quilting guild.  I really liked the morning session using the walking foot.  (Probably because it was in my comfort zone and I was OK at it.)  Here's my first sample showing four different techniques.


I did not know that you can easily sew curving lines with the walking foot!  I was really pleased to learn this technique and very pleased with my second sample too.


I will definitely use these walking foot techniques again.

In the afternoon we started free motion quilting.   I am not a natural.  I guess that is why I registered for the class because I know I need to work on it.  Our first exercise was to write our name and then echo quilt it.  My handwriting is terrible to begin with.  It is more like joined together straight up and down printing than nicely flowing script.  I was also having trouble with my thread tension and had to keep loosening it as my thread kept breaking.  Our next exercise was making loops.  I managed some shaky small loops but try as I might, for some reason I could not make them larger.  We then moved on to making interlocking boxes which I found a little easier although most were not very square and I still could not seem to make them very big, but I think they turned out better than my loops.  The last exercise for this sample was tracing a drawn butterfly and then echo quilting it.  Some of my stitches were way too small but I was pleased that I was able to sew a recognisable butterfly and echo quilt it fairly evenly.


The last exercise was stippling and again I was unable to make it bigger.  Jane tried to help me go bigger in the lower left hand quadrant, but than my thread broke again and it was time to pack up and go home.


The class was great!  Needless to say, I need a TON of practise before the next class which will build on being able to master these skills.  For scale purposes, the sample blocks are approximately 18" square.

Last Wednesday I was quilting with some quilt guild members in the grocery store multipurpose room again and made twelve more basket blocks in red fabrics to go with the twelve I had previously made in black.


I have cut out orange and yellow fabrics to sew into baskets next week.

On the weekend my sewing buddy Marilyn came over and we sewed together for awhile until it started to snow....

Monday, 9 April 2018

Cathedral Window Pincushion

I saw this cathedral window pincushion tutorial by Moda Bake Shop and I happened to have a charm pack I received for free when purchasing some other items so decided to try it out.

I followed every step except one.  Instead of using nine 5" charm squares, I only used five.  If you sew  together the four triangular pieces you trim from the top, you will  have a more than big enough square of fabric for the back and who doesn't want to save fabric!

I stuffed it with quilt batting trimmings that were less than 1" wide so too narrow to piece back together into usable batting chunks.

I used an old button for the centre. 

If I were to make another one, I would pay more attention to which corner of the fabric I used on top though.  If you look at the back of the pincushion, you can see I used two fabrics with burgundy backgrounds and two fabrics with mustard backgrounds.  On the top, however, all you can see of one of the burgundy fabrics is a bright pink flower and all you can see of the other mustard fabric is a pale pink flower.  It's fine, but wasn't the coordinating look I intended.  

The corners are a bit lumpy, but all in all I'm pleased with the result and would make another one.

It's hard to believe, but I think this just might be the first pincushion I have ever made!

Tuesday, 3 April 2018

Dear Jane Quilt, I5, I6, I7, I8 & E9 - 21 of 225

Here are five more completed Dear Jane blocks.

Block I5 I decided looked like a Cathedral Window block, so that is how I made it.  I made the centre cathedral window and then before I pulled back the outer edges, I added four semi-circular pieces of fabric.  Their outer curved edges were folded under and sewn down and their inner edges were left raw and covered by rolling back the cathedral window.  Here is a picture with just the centre cathedral window made.


And here is I5 completed.


Block I6 was drafted to make two of the pointy sections at once.  I decided to make it like a Dresden Plate and made it with two colours so you could see that more clearly.  I pieced my background on the diagonal so that I could pull back the edges of the black fabric from the back to reveal the petals.


And here is I6 completed.


Block I7 was pretty straight forward, four half square triangles separated by a plus sign.  The little triangles in the border were a bit tricky but I just sewed a yellow and black strip of fabric together and cut four triangles from it and then added black to each side.


And here is I7 close up.


I8 is a square in a square in a square in a square and then the corners are triangles edged with black fabric.  If I were to make this again, I would start with my centre square 1/4" smaller so that my last square's corners would not get sewn into the seam allowance, but I am happy enough with it to leave it.


Here is I8 close up.


E9 was easy.  I made the centre with strip piecing and then just framed it.


Here is E9 completed.


And here are twenty sewn together and the start of another column.


Three of these blocks were made early last week, one and a half were made on Thursday with my Dear Jane sewing group and I just finished up the other half this morning.  Still having tons of fun!

Linking to Crazy Mom Quilts for Finish it up Friday!


Sunday, 1 April 2018

Happy Easter!

Even though my kids are grownups and living out on their own with spouses, since there are no little children in my family, I still like to do up an Easter basket for each couple.  Yesterday morning I made two rope coil baskets.  You can find all kinds of instructions and tutorials on the web, here's one from WeAllSew.com.  I even made handles on these two.


As long as you can fit the coiled edge you are working on under your sewing machine, the shape, size, colour and detail of each basket is limited only by your imagination.  You can also wrap the rope with strips of material as shown in these two other baskets I have made.


Happy Easter to you and yours!